Mention the term Flight Management System (FMS) and an image of a Collins or Honeywell text-based screen comes to mind for many pilots. These typically feature a physical keyboard and are fairly common in large jets and airliners. These systems aren’t very intuitive to operate, especially when compared to the latest panel-mount touchscreen systems from Garmin, Avidyne, and Dynon, but they’re very powerful.
 The next generation of FMSs are more user-friendly and come in the form of EFB apps like Garmin Pilot or ForeFlight. This powerful touchscreen system performs many of the same features as a traditional FMS, but at a fraction of the cost. And best of all, many of the apps are able to wirelessly connect to your panel-mount avionics, allowing you to transfer flight plans with just a few taps.
ForeFlight offers the most comprehensive set of flight management features, accessible from the Edit section of the FPL window on the Maps page. This small but feature-rich drop-down window allows you to enter aircraft performance data, enter/modify flight plans, add arrival/departure and instrument approach procedures to your route, and choose the right altitude.
ForeFlight Edit Box
There are several ways to plan a flight from the ForeFlight Maps screen, including the search box at the top right and the touch planning technique to add waypoints directly from the moving map. A more efficient approach is available through the Route Editor, which is accessed from the FPL button at the top of the Maps screen. This feature offers four separate screens, accessed using the Edit, NavLog, Profile, and 3D buttons at the bottom. Profile requires a Pro Plus subscription or higher; 3D requires a Performance Plus subscription.
Here we’re going to focus on the Edit view, since this is the screen you’ll primarily use for entering flight plans and performance details for the flight. We’ll take a look at each function in the order you’d use them over the course of a typical IFR flight.
Preflight Planning
1. Select your aircraft performance profile and ETD – Start by selecting your aircraft profile from the top left corner of the Edit screen. This ensures the app uses the proper true airspeed, fuel burn and other unique performance characteristics during the planning process. Make sure you’ve created an aircraft profile in the More tab for each airplane you fly—otherwise this box will be empty. If you’re a Performance Plus subscriber, the aircraft profile will use preloaded data directly from ForeFlight.
Then, select the ETD button at the lower right of the Edit screen, so that ForeFlight uses the correct winds aloft forecast when estimating groundspeed and time en route.
2. Enter the departure and destination airports – You’ll likely see the airports and waypoints from your most recent flight at the top left of the Edit view. Press the Clear button in the lower right corner to remove this, and you’ll see a message stating “Tap here to create a route.” Tap anywhere in the box and enter the three or four character ID for the departure airport, then press the return button on the keyboard. Repeat the same process to enter the destination airport.
3. Find a route – The next step when flying IFR between airports in busy airspace is to plan a route that will mesh well with ATC’s traffic flow. The best way to do this is with the Route Advisor function, accessed from the Routes button. This will display recently cleared routes issued by ATC to aircraft flying between the two airports, along with the filed cruise altitude. You’ll also see the distance, time en route and estimated fuel burn for each option based on the selected aircraft profile. If you’re a Performance Plus subscriber, you’ll see a button at the top right to filter routes by altitude. Tap any one of the suggested routes to instantly add it to your flight plan.
4. Add an airway – ForeFlight’s route editor also includes a database of airways. To add an airway, tap the name of the waypoint in your flight plan that you’re going to use to join the airway, then select the option to Insert After [waypoint name]. Then it’s just a matter of entering the airway ID (e.g. V157) and ForeFlight will add all the waypoints for that airway into your flight plan.
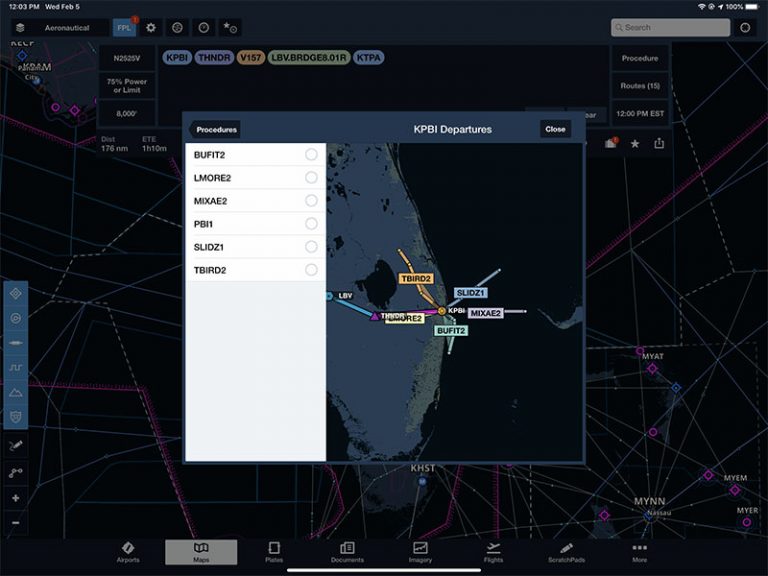
5. Add a departure procedure – In the past, entering departure procedures was a time-consuming process since you had to manually enter every waypoint. Fortunately, the app offers an automated way to add these SIDs to your flight plan using the Procedures button. This will display a pop-up window with “Departure” listed which will then show all the SIDs for the departure airport. Follow the prompts and select a transition (if required), the departure runway number, and lastly, confirm with the Add to Route button at the bottom of the display.
6. Select an altitude – Press the altitude number button in the lower left to display the Altitude Advisor window. This will allow you to choose the best altitude for your route, taking into consideration the winds aloft and your airplane’s performance (requires an internet connection).
7. Get a weather briefing and file the flight plan – Now that your route is entered, you can retrieve a full weather briefing based on the planned flight with just a few taps. Tap the Send To button in the lower right of the Edit view (has an arrow pointing out of a box) and select Flights.
This will populate the flight plan form and performance planning screen with the required data needed to generate a weather briefing, saving you a lot of time.
Press the Briefing button at the top center of the screen to retrieve a standard weather briefing in ForeFlight’s modern layout.
After the briefing, press the Close button at the top left and tap the Proceed to File button in the lower right of the main Flights page. Confirm the data in the flight plan form, and press File at the bottom to submit your flight plan to ATC.
8. Pack your charts – ForeFlight includes another automated feature called Pack that allows you to download all of the charts and weather required for the flight based on the current flight plan. Press the button that’s shaped like a suitcase in the lower right of the edit window back on the Maps page and the app will display a list of all the charts needed for the flight. Press the Pack button in the lower right and ForeFlight will download all the charts needed for the flight. This is also a good preflight step to take if you prefer to manually download your charts in order to verify they are saved for offline viewing.
9. Save the route – Now that you have the perfect route planned for your trip, consider saving it for quick retrieval in the future. Press the star-shaped button in the lower right of the Edit window and choose a name for the route. You’ll then be able to quickly load it in the future from the Favorites button at the top of the map screen.
It’s time to fly
1. Send flight plan to panel-mount avionics – If you’re fortunate enough to be flying with a compatible connected panel system like the Garmin Flight Stream, you can send your flight plan from your iPad to your panel-mount GPS. Press the Connext button at the top of the Maps page and tap Send to Panel. For more information on this system, check out our pilot report on the Flight Stream and ForeFlight.
2. Add/remove a waypoint – Now let’s say that ATC amends your clearance while en route and clears you to a new VOR to deviate around weather. To add the new VOR as a waypoint, go to the Edit box and tap the waypoint that follows where you’d like to add the VOR. Now select Insert Before. Enter the three letter VOR ID and it will be added to your route. To navigate direct to the waypoint, tap the VOR ID and select the Direct To button at the top of the pop-up window. To quickly delete a waypoint from the Edit view, tap and hold on the ID and drag it out of the Edit window until you see a cloud symbol and release your finger from the screen. It’s as simple as that.
3. Monitor the flight performance – Tap the NavLog button at the bottom of the edit window to display a detailed view of all your en route performance data including distance/fuel/time to each waypoint and the ETA at the destination.
4. Load an approach – Follow the same procedure to load the waypoints for an instrument procedure as you would for an arrival or departure. Press the Procedures button, select Approach, choose the type of approach, name of the initial approach fix (or vectors to final), and tap Add to Route.
5. Modify an approach – It happens frequently: ATC tells you to expect a certain procedure or transition and then it’s changed at the last minute. Fortunately, you can make quick changes by tapping on the approach name in the Edit view. This gives options to change the approach type, change the IAF, activate the full approach, or activate vectors to final.
The post Understanding all the ForeFlight FPL and Edit features appeared first on iPad Pilot News.
Source: Ipad appsUnderstanding all the ForeFlight FPL and Edit features


