Three quick Garmin Pilot tips
iPad Pilot News
Garmin Pilot makes it easy to do the basics: view aviation charts, plan a flight, and navigate direct to airports. But if you’re looking to take your EFB skills to the next level, this app is loaded with time-saving features and advanced in-flight tools. Here are three we’ve been using recently.
1. Traffic details
When connected to an ADS-B traffic source, like a GDL 52 portable receiver or a GTX 345 panel transponder, Garmin Pilot has an excellent traffic display. This can be viewed as a split-screen with the main Map page or on a dedicated traffic page.
Beyond seeing nearby aircraft, Garmin has a couple of impressive features for helping to decide whether a target is a threat or not. First, make sure you have TargetTrend selected on the traffic page—this will show where the other airplane is headed, relative to your flight path. After all, you don’t care about its track across the ground nearly as much as you care about whether its track will cross yours. With this on, the green line in front of traffic shows just that. Tap on a target for complete details, including closure rate.
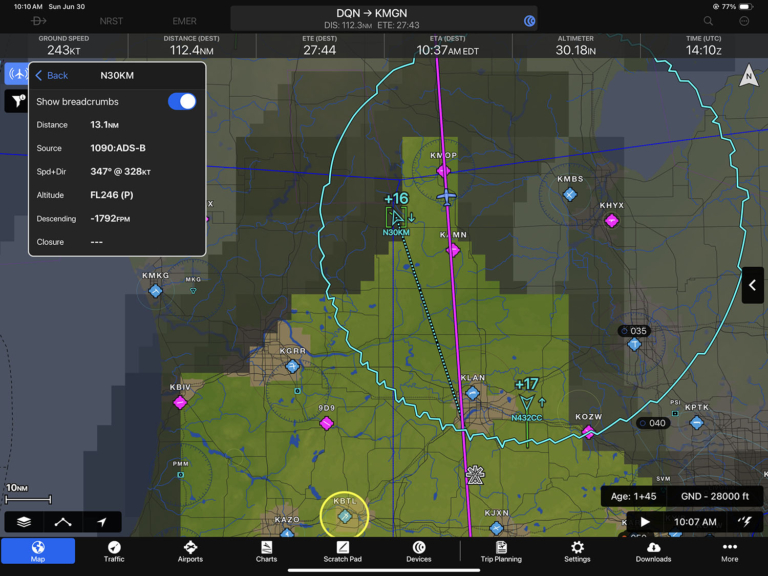
Even with TargetTrend, sometimes you can’t figure out exactly what another airplane is doing: are they practicing maneuvers or flying straight and level? This is where traffic breadcrumbs can help. Tap on a traffic symbol on the map and then choose the target from Garmin’s radial menu. You’ll see detailed information about the airplane, plus a switch you can flip to show breadcrumbs.
2. Map layers
Garmin Pilot has more map layers options than any other aviation app we’ve flown with. This means you can view exactly the information you want, which is helpful when navigating around weather, but it can also be confusing. Two features help prevent issues though. First, tap on the layer button at the bottom left of the Map page, then choose General and scroll to the bottom. Two options should be on for most flights: Auto-Select Layers Based on Connected Devices and also Auto-Select Layer Time/Altitude From Active FPL. Both of these try to make layer selections more automatic, so if you were looking at internet radar on the ground before your flight, the app will automatically switch to ADS-B radar when you’re connected to a GDL 50 or Stratus 3. The second option will choose an altitude for certain weather products (icing and turbulence forecasts, for example) based on your current cruising altitude.
If you leave these options off, or if the app can’t figure out which layer is best, there are robust alerting features built-in. If you see a ! symbol at the top left, tap on it for details. Here you’ll see we left the satellite layer on from our pre-flight briefing, and the app did not switch to SiriusXM:
3. Glide range ring
This is a huge safety feature for pilots flying single engine airplanes—turn it on and the app will show a continuously-updated circle around your airplane, taking into account wind and terrain. But like any calculation, this is an educated guess and not an exact range. If you want to build in some safety margin, use the Glide Range Buffer, configured from the Ownship/Route menu. The default is 20%, but you can increase or decrease that buffer, making the circle smaller or larger. Just make sure your glide performance is set correctly on the Aircraft page.
If you need to use the glide range ring in anger, tap the NRST button at the top of the Map page. This will declutter the screen and highlight nearest airports. Pick an airport that’s within that ring and don’t forget to fly the airplane!
The post Three quick Garmin Pilot tips first appeared on iPad Pilot News.
The post Three quick Garmin Pilot tips appeared first on iPad Pilot News.
Source: Ipad appsThree quick Garmin Pilot tips


