Tips for flying to Canada with your iPad
iPad Pilot News
Canada is an easy flight for many pilots in the United States (especially now that most Covid restrictions have been lifted), and summer is the perfect time to visit. From the scenic mountains of British Columbia to the charming villages of the Maritimes, there are plenty of memorable trips on offer—and many places are only reachable by general aviation airplane.
Fortunately, there are a number of iPad apps that make it easier than ever to plan and fly your flight to Canada. On a recent trip north, we were impressed with how powerful the major Electronic Flight Bag apps have become when it comes to cross-border flying. With the exception of some minor paperwork, it’s pretty much like flying within the US.
Charts
When planning a trip to Canada, a good electronic flight bag app should offer three key features: charts, weather, and flight planning/filing. All three of the big EFB apps (ForeFlight, Garmin Pilot, and Fltplan Go) are capable options, although you’ll want to consider all the details before you blast off.
For charts, it’s worth remembering that US sectionals and IFR en route charts work for the eastern portions of Canada (especially Ontario, Quebec and the Maritimes). If you’re flying VFR just over the border, you may not need a Canadian chart subscription at all. Also note that all three apps—especially ForeFlight and Garmin Pilot—have excellent base maps for North America. While not officially charts, they offer good situational awareness, with airports, terrain, water features, and more.
If you do decide to add Canadian charts, the apps do a nice job of combining coverage areas. Note the way Fltplan Go stitches together Canadian VNC charts (top) with US sectionals (bottom):

If you’re flying IFR, it’s definitely worth getting that add-on subscription so you’ll have complete airport information and instrument approach charts. These look very similar to US approach plates so the transition is easy, although there are a few differences to review before takeoff. We recommend reading the legend.
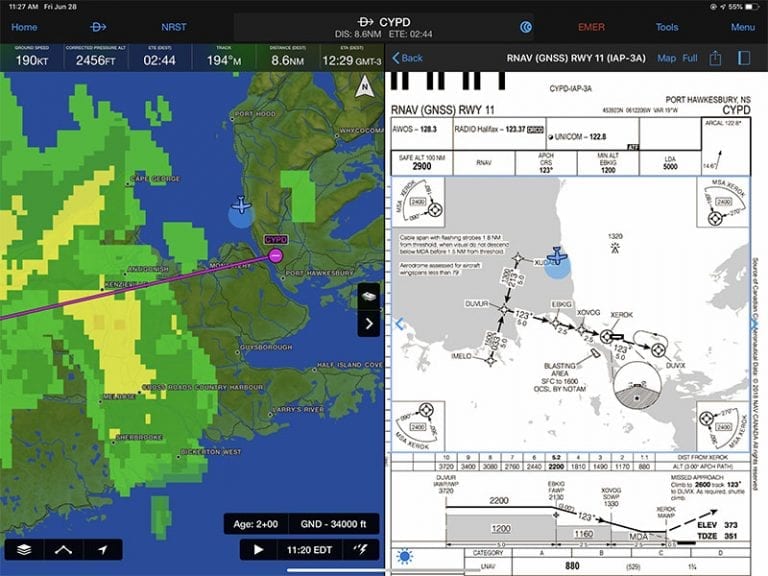
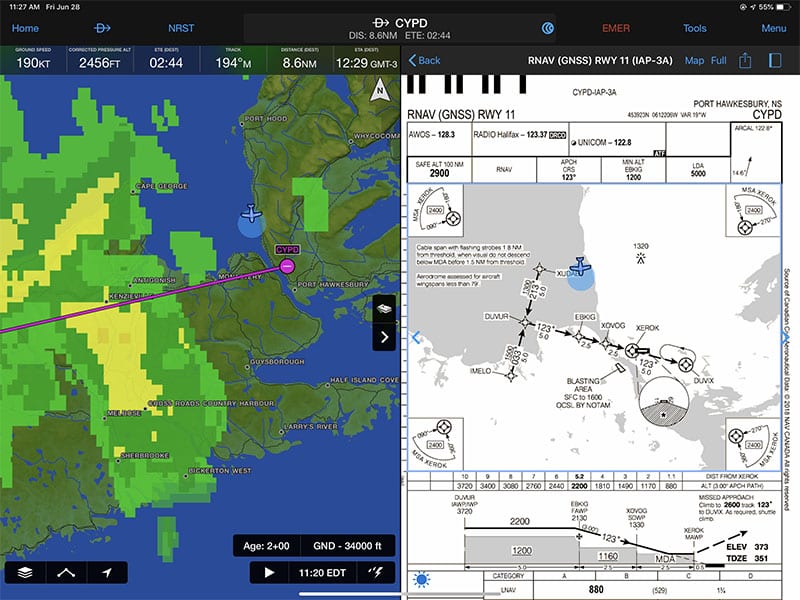
Here’s an example of Garmin Pilot displaying a Canadian approach plate next to a data-driven base map with SiriusXM Weather on the left side. It’s a powerful screen that should make any US pilot feel at home:
There’s another option for Jeppesen chart subscribers (either in their app or with a glass cockpit subscription). With a quick login, you can add those charts to ForeFlight or Garmin Pilot and get that familiar view of airports and procedures. This is a good way to standardize the chart experience and is particularly helpful if you plan to fly back and forth frequently. If you aren’t a subscriber already but you’d like to add Jeppesen charts for Canada, ForeFlight makes it easy to do for $179/year. You can access the charts the same way (in the Plates tab or on the Airports tab). Here’s an example of a Nav Canada chart on the left and the Jeppesen version of the same approach on the right:
ForeFlight subscribers with a US plan can add Canadian coverage for $100/year, which includes VNC charts (NAV Canada’s version of a sectional), IFR high/low charts, approach plates, and taxi charts. Garmin Pilot offers an add-on Canada Standard plan for $99.99/year, which includes en route charts, weather, and navigation data; for $54.99/year extra, you can add terrain alerts, synthetic vision, approach charts, and more. Fltplan Go, as always, is free, including approach plates, VNC charts, and the Canada Flight Supplement. One good option to consider is using Fltplan.com for flight planning and then using the Garmin Pilot app in flight; all your Fltplan.com NavLogs and documents can sync to Garmin Pilot.
ForeFlight also offers complete access to NAV Canada documents, including the helpful Canadian Flight Supplement, chart legends, and the Aeronautical Information Manual. Go to the Documents tab, then tap on the NAV Canada drive on the left side to download specific documents:
Flight Plans and Pre-Flight Weather
All three apps offer VFR and IFR flight plan filing, both to and from Canada, at no additional charge, and there’s really nothing different to do. Since the apps have been encouraging/requiring pilots to use the ICAO flight plan format for years, you can just file a flight plan like you normally would. This includes detailed time en route calculations and popular ATC routing.
When it comes to weather, things are again pretty similar to the US —radar, satellite and METARs are identical—but there’s simply less of it to view. Ground-based radar coverage is limited to areas within about 200-300 nautical miles of the border, and while this covers most of the populated areas of Canada, intrepid adventurers will notice some blank spots further north. METARs are available but because airports are more widely scattered, you may find yourself 100 miles or more from the nearest weather report.
Garmin Pilot does a nice job of showing the radar coverage areas (dark areas are outside the reach of radar):
eAPIS Help
In spite of what you may hear, the paperwork side of an international flight is pretty simple. Just file a flight plan (VFR or IFR), file an eAPIS manifest with US Customs, and then call customs (the nationwide CANPASS number if you’re flying into Canada; the specific US Customs facility you’ll be using when flying back to the US).
That second step can be a little tricky, since the government website is not intuitive and the penalties for making a mistake are significant. As a result, many third party services have popped up to make eAPIS filing a little easier. The least expensive option is FlashPass, an iOS app that consolidates passenger information and makes eAPIS submission a one-tap process. It’s $72/year, and well worth it.
For regular users of Fltplan.com, the company offers a premium eAPIS service for $249/year. Once you’ve entered passenger information (passport number, address, etc.), filing eAPIS is simple. The website automatically calculates border crossing times based on your Fltplan.com flight plans, minimizing mistakes. This is great if you need to change your route of flight or arrival airport due to weather (as we had to do on a recent trip)—with a few clicks you can have a new eAPIS form filed.
Just remember to file eAPIS both on the way out of the US and on the way back in. You should receive an email from the Department of Homeland Security with a confirmation code. Do not take off if you haven’t received this.
There’s one other detail for entering Canada: a Covid-related step called ArriveCAN. This requires you to fill out information about your travel details and vaccination status. Covid testing is not required but you will need to upload copies of your vaccination records and submit this within 72 hours of arrival.
Weather Receivers
Once you’ve filed all the paperwork and departed, in-flight weather quickly becomes a key issue. Even in summer, Canada can offer thunderstorms, icing, low ceilings, and more, so having some type of datalink weather is a great idea. The two most popular options—ADS-B and SiriusXM—work, although with important limitations. If you’re taking your Stratus, Sentry, or GDL 52 along, make sure you understand when it will work and when it won’t.
ADS-B receivers do work part of the way into Canada, so for flights to Toronto, Montreal, Vancouver, and Prince Edward Island, you can expect radar at least most of the way to your destination—although ADS-B does not transmit Canadian METARs or TAFs. You’ll need to have both ground-based radar coverage (the data) and ADS-B reception (a way to receive that data) to get a good NEXRAD picture. That means closer to the border is better and higher altitude is better. Here’s a map showing how far the radar reaches into southern Canada using ADS-B (click on image for full size):
SiriusXM Weather, available via a portable like the Garmin GDL 52 or a panel-mount like the Garmin GDL 69/69A, has no altitude limitations, since it comes via satellite. It does offer Canadian radar and METARs (unlike ADS-B, which depends on US radar reaching across the border). More good news: this Canadian radar package is included in the SiriusXM Pilot for ForeFlight and SiriusXM Pilot Preferred packages, two popular options. While in-flight weather information is excellent using these services, there are still limitations. Note the cut-off satellite image and the limited ground-based radar circles below as you move into eastern Canada:
We think for a single trip to Toronto or Montreal, you can probably make do with an ADS-B receiver. For hard IFR flights, longer trips deep into Canada, or for regular cross-border trips, SiriusXM is a good investment. Subscriptions can be paused during winter if you only make these flights in the summer.
General Tips
Flying to Canada involves more than just iPad apps and weather receivers. For some good tips, visit AOPA’s dedicated page. This article from Air Facts also has some good reminders for IFR pilots. For example, on a recent trip we were reminded of a few differences compared to the US:
- Canada has published IFR takeoff minima (usually 1/2 mile visibility), unlike the US, where Part 91 pilots can blast off in zero/zero conditions (whether that’s a good idea is debatable).
- Radio and radar coverage outside big cities can be limited, which means you may cancel IFR but be asked call Flight Service on the ground to cancel your flight plan or search and rescue services. You may also hear something like, “cleared out of controlled airspace via the XYZ approach.”
- Getting IFR clearances or opening flight plans at remote airports can be done via phone, but there are also an increasing number of DRCOs, which allow you to dial flight service over a published radio frequency. Do your homework here and know what services are available. It takes 4 mic clicks to open up the link.
- Fuel is usually priced and pumped in liters, not gallons. If you need 50 gallons, make sure you get 50 gallons and not 50 liters—the difference could be fatal.
- If you’re flying in Quebec you will hear some French being spoken on the frequency. The controllers seamlessly switch back and forth; if you’re ever unclear, just ask. Checking in with a quick “bonjour” is not required but considered polite.
If you’ve never flown to Canada, we encourage you to start planning. It’s fun, easy, and rewarding. If you can plan and fly a 500-mile trip in the United States, you can handle a flight up north.
The post Tips for flying to Canada with your iPad appeared first on iPad Pilot News.
Source: Ipad appsTips for flying to Canada with your iPad


