High on our list of under-appreciated features in ForeFlight is track logging. The ability to automatically record your flight and then replay it in the comfort of your home can make your flying more precise and make it easier to share a memorable trip. Here’s an overview.
How to log

First, make sure you are creating track logs when you fly. There are three main ways to do this:
- Record directly in the app. This is the easiest option, because it can be set up to work automatically. From the Maps page, you should see a REC button on the left side of the screen. This will turn blue when it’s recording, and show an elapsed time underneath. If you don’t see this, go to More > Settings > Track Log and make sure Enable Start/Stop Control is set to on. You’ll also notice a switch here to Enable Auto Start/Stop. With this set to on, ForeFlight will automatically detect a flight (usually when groundspeed goes above roughly 40 knots) and stop it when you’ve landed. Two important notes here: you must have a GPS source to record your track (either with a GPS built into your iPad or an external GPS connected via Bluetooth or WiFi); and the app must be open and running in the foreground. This last part is key because if you turn the screen off on your iPad, or switch to another app, track logging may stop.
- Record using a Stratus ADS-B receiver. This requires an external device, but in addition to showing in-flight weather, Stratus 2/2S/3 devices also include automatic flight data recorders. These will record your flight automatically, so you can turn off your iPad screen or switch apps without worrying about losing data. Stratus will also record pitch and bank data using the built-in AHRS, giving you an additional data point to review after a flight. Here are some tips for using Stratus flight data recording.
- Record using Garmin Connext. If you fly with a Garmin FlightStream 510, you can connect ForeFlight to your panel for a variety of features, including weather, traffic, backup attitude, and track logs. Once you’re paired to the Flight Stream, the track logging is automatic, and includes AHRS data if you have a G500/G600 TXi panel.
- Import G1000 track logs. If you’re flying with a Garmin G1000 glass cockpit, you may be able to use that for logging flights. Note that not all G1000 panels include track logging, but if yours does, you can extract track logs (in CSV format) from your MFD using a data card and then send them to your iPad. Open ForeFlight, go to the Track Logs page, and tap the down arrow at the top left to import a file.
Reviewing track logs
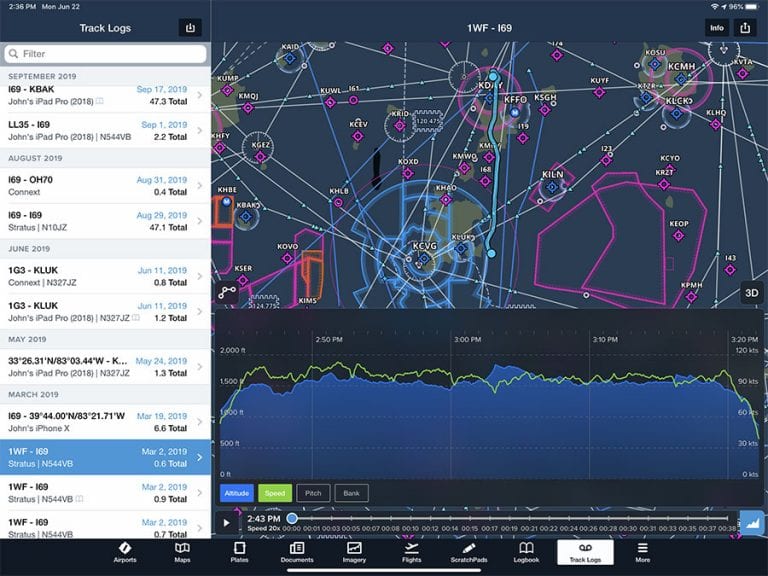
Once you have track logs in ForeFlight there are lots of ways to use them. From the More tab, choose Track Logs and you’ll see a list of all recent flights on the left side of the screen. Flights are sorted by date, and will show the departure and destination airports. You’ll also notice ForeFlight shows what device was used to record the flight (iPad, Connext, Stratus). Tap on a flight to display the map on the right side.
The top half of the screen shows the traditional aeronautical map, and the bottom displays a profile view of flight stats. You’ll see altitude and speed graphs by default; if you recorded your flight with a Stratus or Garmin panel, you can also turn on pitch and bank graphs. You can pinch to zoom in on a particular segment of the flight in order to get more detail.

Press the play button at the lower left to replay the flight at 20x speed, or use the slider to manually scroll through the flight. You can select up to two parameters simultaneously when comparing data.
You can access additional track log information by tapping the Info button in the top right of the Track Log page. View textual information about the track log, including the flight summary; distance, time, and speed metrics; out, off, on, and in times; an associated Logbook entry if one exists, and add or view your notes for the Track Log.

If you subscribe to a Performance plan, you can also play the flight back in 3D. Tap the 3D button at the right side of the screen to bring up a full-screen view. From here you can see your track, including path and altitude. Tap the two buttons in the bottom left corner to switch from egocentric (top) and exocentric (bottom). You can tap the 5X button to change between 1X/3X/5X/10X/20X for playback speed. As before, you can scrub to a specific part of the flight using the timeline across the bottom of the screen.

Share track logs
There’s more to track logs than just the main view in ForeFlight. Tap the Send To button in the top right to share the Track Log via email or create a new Logbook entry. When you create a new logbook entry, ForeFlight will automatically populate the departure, destination, time en route, and N-number (if detected). This will also attach the track log to your logbook entry, so it’s easy to find the right flight from either the Track Log or Logbook page.
Another good option is to open it online in ForeFlight’s web view (the ForeFlight.com option). This is a fast and easy way to share a flight with someone else.

You can also send the track log data to other apps. One popular option is Google Earth (if installed on your iPad). Tap the Send To arrow button, then Open KML in… After a brief delay to build the file, you’ll see the option to send the track log to another app. Choose Google Earth from the list and it will open in the app. This is a fun way to review a flight, but honestly the latest ForeFlight track log tools include most of these features.

For a more detailed analysis, send the KML file to CloudAhoy. This powerful debriefing app can display a variety of charts, overlays, and recreations of your flight. Learn more about CloudAhoy here.

The post Get the most out of ForeFlight’s track log feature appeared first on iPad Pilot News.
Source: Ipad appsGet the most out of ForeFlight’s track log feature