
While in-flight features like terrain alerts and ADS-B weather get a lot of attention, it’s the preflight where apps like ForeFlight can really save time. They make it easy to evaluate airports, find the best route, calculate weight and balance, review weather, and so much more. But with all these features comes a certain amount of complexity.
How do you plan a flight – from the Maps page, the Flights page or somewhere else? In this post, we’ll walk through a procedure for planning a flight and considering all the important information. It’s certainly not the only way to plan a flight in ForeFlight, but it should get you thinking.
Enter departure and destination on the Maps page
First, start by entering your departure and destination airports on the Maps page. This can be done using the search box at the top right or the FPL box (tap the FPL button, then Edit). This will draw your course line on the map and give you a quick overview of the route, including airspace and weather.

Choose your airplane
Next, tap the N-number button to the left of the Edit box and choose the correct airplane profile. This is critical for getting accurate performance calculations and for helping to find the correct route. If you haven’t set up an aircraft profile yet, go to the More page, then Aircraft.

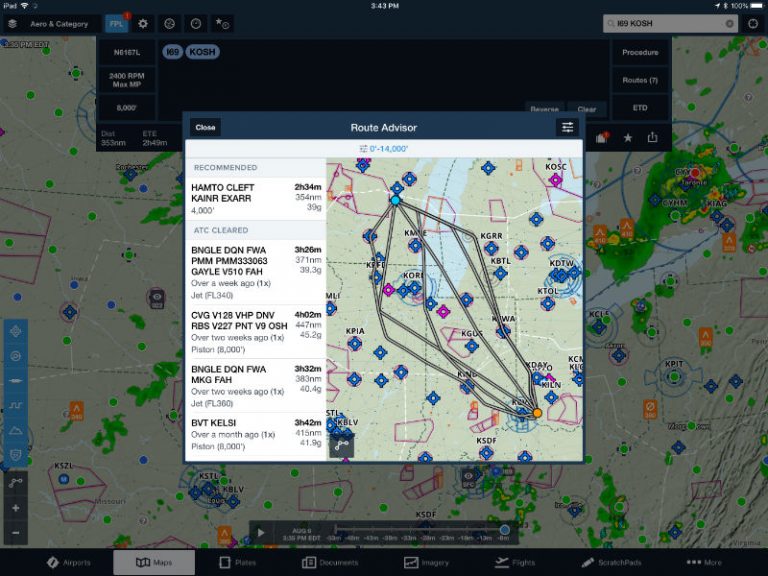
Choose a route
Tap on the Routes button to the right of the Edit box and you’ll see a list of routes that Air Traffic Control recently used between your departure and destination. This is a huge time-saver for IFR pilots, since you can file the correct route without hours of research.

Choose an altitude
The last step on the Maps page is to pick the right altitude. For this, tap on the altitude button on the left side of the Edit box. Your aircraft’s default altitude will automatically be selected, but you can choose another to minimize time or fuel burn. Note that an internet connection is required to get updated winds aloft data.

Send to Flights
Now you have a good idea of what your flight will look like, including the route, altitude, time en route, and fuel burn. The next step is to use the Flights page to finalize details, but there’s an easy way to save time and eliminate the need to re-enter data. From the Edit box, tap the up arrow at the bottom right corner. Using the Send To menu, you can send your route, altitude and airplane to the Flights tab.

Request a formal briefing
At the top of the Flights page, tap the Briefing button to request an official preflight weather briefing. This will include all the essential information you need to make a smart go/no-go decision, including the synopsis, AIRMETs/SIGMETs, METARs, NOTAMs, and more.

Review fuel, weight and balance
Further down the Flights page, you’ll see your route and altitude (and you can change them here if you need to, based on your briefing), but you’ll also see information about fuel planning and weight and balance. Some of these features require a Performance Plus subscription, but they are a great check of your math. Will you land with enough fuel? Will you be under maximum gross weight for takeoff? This page is a quick check and also allows you to experiment with different range/payload scenarios.

Pack your databases
ForeFlight makes it easy to download all your chart databases for a specific flight, with its Pack feature. This can be done on the Maps page, but there’s also a button for it at the bottom of the Flights page that is very convenient. After you verify your route and altitude, tap the Pack option and download everything for the flight.

File your flight plan
At the bottom of the page, tap the Proceed to File button to file your flight plan with ATC. You’ll receive an acknowledgement almost immediately and later on you’ll receive an expected route from ATC.

Review your navlog
While not required, many pilots like to have an old school navlog for longer flights, listing each and every waypoint along the way. ForeFlight makes it easy to create one, by tapping the Navlog button at the top of the Flights page.

Of course there are plenty of other steps you might want to take while planning a flight: reviewing airport information from the Airports page, creating a binder on the Plates page, or consulting the weather forecast charts on the Imagery page. But by following this path, you’re guaranteed to check off the most essential preflight planning tasks.
The post A systematic approach to planning a trip in ForeFlight appeared first on iPad Pilot News.
Source: Ipad appsA systematic approach to planning a trip in ForeFlight