Welcome to flight training!
This is your beginner’s guide to learning to fly with an iPad as your primary source of aviation data and charts. You’ve come to the right spot if you’re a student pilot who has decided to get started with the the iPad, which in my opinion is the best modern advancement in aviation since the autopilot. There are a plethora of options for your iPad, some inexpensive and some require you to eat Ramen for a couple months. As a student pilot however, you need just enough to aid your training without adding additional complications or distractions.
I recently completed the first phase of my training by earning my Recreational Pilot’s license. It’s an amazing feeling of accomplishment and pride to complete your flight training goal. Along the way you’ll learn a lot about what you need and don’t need. Before you go flying with an iPad for the first time, here are some suggestions on what you should do first and be prepared for.
Which iPad should I buy?
Starting off, the question I hear most is “Which iPad should I buy?” Well here’s what you should consider.
New vs. used iPad
 Electronics have only so many years before the hardware inside them can’t keep up with the demand that new apps require. Eventually they’ll run slow, and that’s an unfortunate fact of life. For that reason I recommend buying a new iPad and getting a good 3 to 5 years out of it rather than just get by with a used one that will only last 1 or 2 years.
Internal memory
32GB is the smallest size available currently. Some day that will have to change because it’s already just too small. 64GB is a safe place; the last thing you want to be doing when flight planning is deleting files off your iPad so you can make room to download more sectional charts. Don’t limit yourself, get a 64GB or higher.
Cellular data vs. WiFi only
Having the ability to use cell data instead of WiFi only on your iPad is a luxury that I was able to live without. Shocking I know, but in a pinch if you absolutely need data on the iPad and you’re not in WiFi you could use the cellular hotspot on your iPhone to connect the iPad. It’s easy, handy and saves you about $130 plus monthly fees on the cost of your iPad.
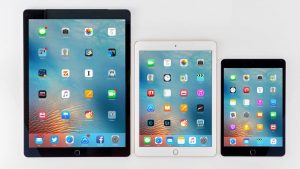
Size matters: Mini, 10.5” iPad Pro or 12.9” iPad Pro
Personally I fly with a Mini iPad 4 and wouldn’t have it any other way. But I’ve also talked to just as many pilots who swear by the larger versions, especially the new 10.5″ iPad Pro. It’s really a personal preference and depends on the size of the cockpit in your training airplane and flight control configuration. There are several more variables to cover on this one, so I’d suggest you check out this article on The best iPad for Pilots for some additional insight to help you decide.
Staying legal
 Next let’s talk about EFBs, which is short for Electronic Flight Bags. The first thing that you should know is that having an EFB with current digital charts is a legal replacement for paper charts in the cockpit. An EFB is the iPad or Android tablet you’re navigating with and has an EFB app installed with the current, up-to-date FAA charts required for the flight. So to reiterate that very important jargon, if you have your iPad up-to-date with the most recent charts needed then legally you’re not required to have any paper charts with you. Hallelujah, it’s a wonderful thing when the government recognizes the century of which we live in, isn’t it?
There’s one catch I’ve learned, though. Not having any paper charts in your flight bag will give the nearest 60-year old pilot chest pains; and we don’t want that. They’ve got great stories and we like hearing those. So I recommend spending the couple bucks on your local sectional and having it with you just in case. Bonus points for a Chart Supplement (formerly known as the A/FD).
For a compressive review of the legalities related to the iPad, check out the iPad Legal Briefing for pilots.
Choose an EFB app
 Next you’ll need an EFB app to download and display the FAA charts. There are many options available for pilots and choosing one can be a daunting task. When it comes to apps, my favorite is ForeFlight. I find it’s the easiest to use and most intuitive at displaying the important information. Garmin Pilot is my runner up, and it’s a close second. Garmin’s app is designed to feel familiar to pilots who are used to flying with some form of Garmin panel-mount GPS or G1000. Since I was unfamiliar with this line of avionics, the Garmin app didn’t appeal to me. I think that the layout was optimized to transition pilots comfortably from GPS to iPad, so if that sounds like you, start with Garmin Pilot.
Choosing the app you like best is more easily done than read. Both of these apps and others offer 30 day free trial periods so you can fly with it and decide for yourself. I highly recommend doing that. You’ll notice that most of these apps offer both a basic version, and then a more-capable “Pro” version. Starting out you can’t go wrong with buying the less expensive version, and then upgrade down the road when you’re able to take advantage of some of the more advanced features.
While you’re testing out these apps you need to make sure you’re familiar enough with them to confidently use them in flight. Ask your buddies for tips, watch some YouTube videos, or visit the apps section of iPad Pilot News for the latest news about aviation apps.
iPad accessories
GPS receiver
 On to GPS. Now that you’ve got an iPad and a favorite EFB app, you should buy yourself an iPad GPS to display your position on the charts during flight. Some of you might be considering the cellular version of the iPads has a built in GPS. This article explains all about it. Personally, I use an external GPS. My little hundred dollar Dual GPS connects to my iPad via Bluetooth and has yet to fail me on the job. If you’re just getting started flight training then you really don’t need an expensive GPS. For more information about iPad GPS, check out this article on choosing the right GPS.
ADS-B receiver
The next step up from a dedicated GPS is a portable ADS-B receiver, which will allow you to view free datalink weather (radar imagery, METARs, TAFs and more) in your favorite app while in flight. ADS-B is the most cost-effective way to get weather on an iPad in the airplane, since you won’t have internet access up at altitude. These can range anywhere from $200 up to $900, and also provide traffic, GPS position and a backup attitude display, in addition to inflight weather. Beyond that, there are options for satellite weather, using the SiriusXM network, although these require a monthly subscription.
If you’re on a budget it’s ok to stick with just a basic GPS when getting started, but you’ll probably want one of these ADS-B receivers eventually, especially when going on longer cross-countries or working on an instrument rating. Here’s a good article giving an in-depth overview of portable ADS-B receivers.
iPad mounting
 Where do you plan to keep the iPad when you’re flying? Mounting options for the iPad essentially break down to two groups – mount it on the plane or mount it on your leg. Your first time flying with the iPad will be a little less organized. It does take practice to make the iPad do what you want when you want it. But as a student pilot, flying the plane is your first priority. Suction cup mounts and yoke mounts are a great option to place the iPad right in your view. But it could be too easy to stare at the iPad for 30 seconds and now who’s flying the airplane?
A good kneeboard puts the iPad at your fingertips without being in your scan. Just remember that altitude, airspeed and heading are most important to you and try not to bury your head in the iPad during flight. Once you’re used to it, having an iPad will greatly speed up the time looking at charts so you can focus on flying more. Try out a kneeboard and I’m betting you’ll be hooked. Here’s a good iPad mounting guide to get you started.
Backup power
So you’re building your flight bag with gear for the iPad and you’ve got a GPS, kneeboard and your EFB app. Here’s a few other things you should consider. Backup power is great for both the iPad and GPS. Either a cigarette lighter adapter that puts out 2.4 amps on both USB hubs or an external battery will do the trick. My favorite battery is the Rugged Portable Battery Pack. This thing is a power house, with two USB ports and enough juice to charge your iPad multiple times before it’s out of battery. You can’t go wrong. More tips on powering the iPad can be found here.
Additional resources
Also consider some flight training apps for home study when away from the airport. Sporty’s Pilot Training app is optimized for the iPad, and you can try out the app free here. It contains hours of in-flight video training, along with interactive written test prep. If you’re just learning ForeFlight, there’s an app designed to teach you exactly how to get started flight planning on it. It’s called Flying with ForeFlight and it’s available in the Pilot Training app.
Lastly I want to point out an excellent article that all student pilots should read, which discusses how the iPad can be integrated into the flight training process: Should you use an iPad during flight training?
By starting with these pointers, I’m confident that you’ll have an easier time adjusting to flying with the iPad. The are many benefits to flying with an EFB instead of old paper charts, but first on my list is that young pilots are more comfortable using electronics and can greatly benefit from the technological advances. Spend some time reading over the articles here on iPad Pilot News and talk with other pilots, and I’m confident you’ll feel comfortable developing your own plan for getting started with an iPad in the airplane.
Source: Ipad appsThe student pilot’s guide to learning to fly with an iPad